JVM microservices - run Docker containers on Windows
Microservices is one of the loudest IT buzzwords, everybody’s anxious to try it.
But what Linux and MacOS users get for free is not so easy in Windows.
This guide shows how to setup Windows environment for running Docker containers, as a basis for microservice architecture projects.
- Glossary
-
-
GIT-SCM - Git For Windows project, containing
git,bashand otherLinuxtools -
Environment variables -
Windowsenvironment variables, assumed to be managed via Control Panel
-
In fact, Docker Toolbox for Windows comprises everything for running Docker containers because it is bundled with GIT-SCM project.
Unfortunately the default installation has few drawbacks
-
No option for changing GIT SCM destination
-
Сommand line tools ain’t added to
PATHenvironment variable -
Impossible to configure additional
gitparameters unlike in original GIT-SCM installer
To overcome those and to achieve the better environment flexibility, I’ll explain in this guide a longer way, where all required software will be installed from separate bundles.
|
Following old habit I tend to avoid installation of tools that are planned to be used from command line to |
Setup MSYS2
MSYS2 is a basis project for GIT-SCM and provides advantages over GIT-SCM,
- Advantages over GIT-SCM
-
-
More command line oriented, not limited to
gitusage -
Symbolic link support
-
Built-in package manager
pacman, ported fromArch Linuxdistributive-
Possibility to install arbitrary tools not included into
MSYS2distributive -
Possibility to upgrade
MSYS2core from command line
-
-
- Installation steps
-
-
Run installer from https://msys2.github.io/ and follow instructions
-
Use
d:\opt\msysas a destination folder -
After installation is completed add
d:\opt\msys\usr\bintoPATHenvironment variable
-
- HOME directory location
-
By default
MSYS2uses own directory for user home, so insteadC:\Users\your home will be located ind:\opt\msys\homefolder. This behavior can be overridden by adjusting/etc/nsswitch.conffile.Find and change line
db_home: cygwin desctodb_home: windows desc. - Linux Tools Manuals
-
mancommand is not installed by default, but you can enable it usingpacmantool.$ pacman -S man-db
Setup Docker Toolbox
-
Run
Windowsinstaller from https://www.docker.com/docker-toolbox and follow instructions -
Use
d:\opt\dockeras a destination folder -
Uncheck
Git for Windowscheckbox, we will use Linux tools fromMSYS2installed before
Setup ConEmu
MSYS2 provides possibility to run bash but as soon as you run many consoles you start to get lost in those floating windows. ConEmu comes to the rescue, providing comfortable tabbed interface for bash shells along with additional functionality improving command line experience and better integration on`Windows`.
-
Run installer from https://conemu.github.io/ and follow instructions, alpha releases can be used
-
Create
ConEmutask for runningbashconsole and run it on program startup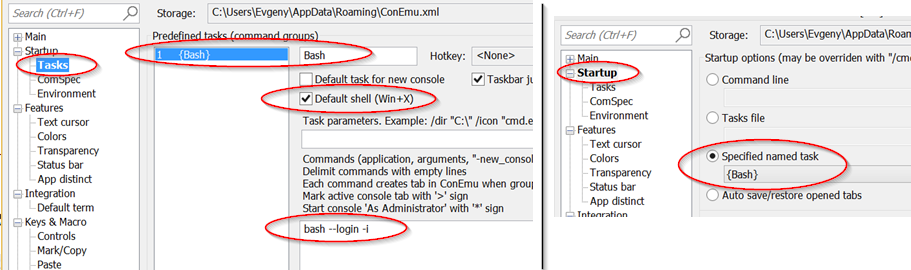 Figure 1. ConEmu task for running MSYS2
 -
Create new consoles inside single
ConEmuwindow Figure 2. ConEmu single window settings
 -
Integrate with
Windowsshell, environment variableCHERE_INVOKINGforcesMSYS2to use current directory as a working directory for newbashinstance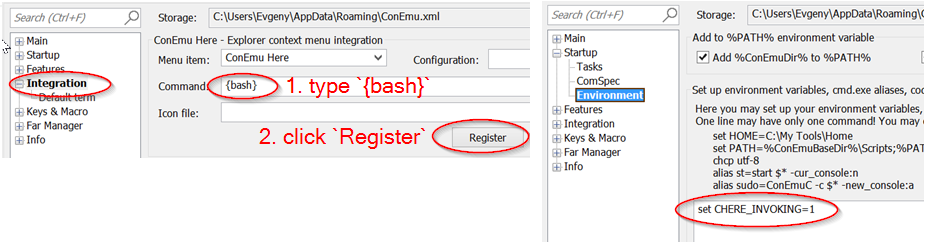 Figure 3. ConEmu shell integration settings
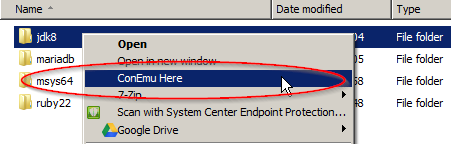 Figure 4. ConEmu shell integration
Verify that everything works
-
Start
ConEmuprogram (should start withbashconsole running inside new tab) -
Open new console in
ConEmuwithCtrl+Xhotkey, this is just to checkCtrl+Xworks -
Go to
/d/opt/docker/folder and run./start.shthere -
Execute
docker run hello-worldcommand -
Check output, it should looks like below, refer to Docker Guide for latest actual information about the output
$ docker run hello-world

Hello from Docker.
This message shows that your installation appears to be working correctly.

To generate this message, Docker took the following steps:
 1. The Docker client contacted the Docker daemon.
 2. The Docker daemon pulled the "hello-world" image from the Docker Hub.
 3. The Docker daemon created a new container from that image which runs the
    executable that produces the output you are currently reading.
 4. The Docker daemon streamed that output to the Docker client, which sent it
    to your terminal.

To try something more ambitious, you can run an Ubuntu container with:
 $ docker run -it ubuntu bash

Share images, automate workflows, and more with a free Docker Hub account:
 https://hub.docker.com

For more examples and ideas, visit:
 https://docs.docker.com/userguide/
docker-machine tool
Docker Toolbox installs VirtualBox and creates own VM inside it named default.
Although VM management can be performed via VirtualBox UI, there’s useful docker-machine tool.
It allows to interact with VirtualBox VM from command line.
Some useful commands are shown below.
-
$ docker-machine ls- list machines and their statuses -
$ docker-machine stop default- stop defaultVirtualBoxVM -
$ docker-machine start default- start defaultVirtualBoxVM -
$ docker-machine help- for more information
Improve Git experience on Windows
If you plan to use git then pay attention to steps below, otherwise this section could be skipped.
- Line endings
-
GIT-SCM as well as other sources advice to use
core.autocrlfequals totruewhile working withgitonWindows. Execute command below to set this parameter for allgitrepositories.$ git config --global core.autocrlf true
- Password caching
-
Working with remote repositories via HTTP / HTTPS requires entering user name password. It’s good to use credentials helper that caches passwords, so there no need to type them each time. For
GitHubit’s easy and explained in this article. But this approach doesn’t fit well withBitBucketrepositories.Git Credential Manager for Windows project works fine with both
GitHubandBitBucket, but currently it can be used only withgitinstalled via GIT-SCM - track сorresponding issue.The solution is to use Git Credential Manager for Windows predecessor that works fine with any
gitinstallation. - Branch name in shell promt
-
Add following to your
~/.bashrcto displayGitbranch name in shell promt.
. /usr/share/git/completion/git-prompt.sh

PS1='\[\033]0;$MSYSTEM:${PWD//[^[:ascii:]]/?}\007\]'    # set window title
PS1="$PS1"'\n'                                          # new line
PS1="$PS1"'\[\033[32m\]'                                # change color to green
PS1="$PS1"'\u@\h '                                      # user@host<space>
PS1="$PS1"'\[\033[33m\]'                                # change color to yellow
PS1="$PS1"'\w'                                          # current working directory
if test -z "$WINELOADERNOEXEC" ; then
  PS1="$PS1"'$(__git_ps1)'                              # bash function
fi
PS1="$PS1"'\[\033[0m\]'                                 # change color to normal
PS1="$PS1"$'\n'                                         # new line
PS1="$PS1"'$ '                                          # prompt: always $
What’s next ?
This is the first post about JVM based projects based on microservice architecture, mostly related to Windows specific features.
Second post explains how to create and run sample JVM project using environment described in this guide.