Automate GitHub Pages publishing with Jekyll and Travis CI
Content is a KING. Neither fancy CMS nor online WYSYWIG editors are, but content is.
That’s why Jekyll powered GitHub Pages got such a popularity.
Just push HTML, Liquid, Markdown etc, then files got processed by Jekyll
and the whole site becomes available online in a minute.
However, if you’d like to use extra Jekyll features, for instance AsciiDoctor, you should manage site generation yourself.
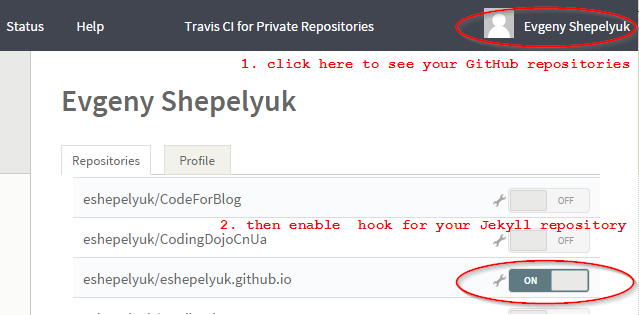
This quite boring activity could be simplified by leveraging Travis CI continuous integration project.
Setting up Jekyll
The only precondition is that you have Jekyll site already configured using Bundler and you can run it locally with
bundle exec jekyll serveSetting up Travis CI
The whole idea was to make publishing experience of highly customized Jekyll project to GitHub Pages exactly the same
as publishing of standard Jekyll site. You just push your changes to git, wait couple of minutes and refresh the page with new content.
I’m using User Pages approach as described here so I have two branches for my setup
-
masterfor generated static content -
jekyllfor markup sources and configuration
The goal is to configure Travis CI job to listen for commits on jekyll branch,
then run jekyll build for process markup sources and then push generated content to master branch.
Travis CI configuration
Then let’s limit commit trigger to jekyll branch only and explicitly configure the script that will be executed after commit detection.
For this we have to put file .travis.yml to the root of jekyll branch with following content.
language: ruby
script: "./build.sh" # execute this script on each commit
branches:
  only:
  - jekyll # only take into account `jekyll' branch
rvm:
- 2.1.2 # version of `ruby'
Generate and encrypt GitHub token for Travis Ci
Since we’d need to commit and push our changes to other (master) branch from within the build script
it’s mandatory to checkout this branch either using HTTPS or SSH protocol, as described HERE
Easiest way for us is to clone using HTTPS protocol and use personal access token for authentication.
-
Generate GitHub token
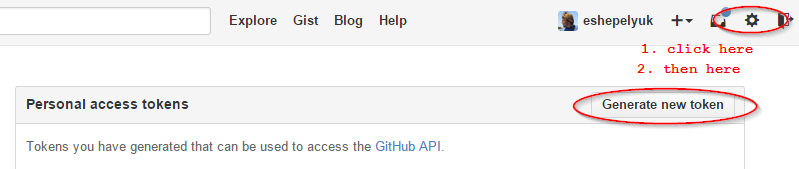
| Copy generated token somewhere to be used in the next step. |
Putting clear text tokens into script isn’t good idea, but thanks to travis command line tool
we can encrypt any name=value pair and later expose them as environment variables to the build job.
Execute following code in the working directory where jekyll branch is cloned to.
gem install travis
travis encrypt GH_TOKEN=<token> --add env.global
The command above should add following lines to your .travis.yml.
env:
  global:
    secure: HERE GOES ENCRYPTED STUFF
Build script
And finally the build script.
#!/bin/bash

# only proceed script when started not by pull request (PR)
if [ $TRAVIS_PULL_REQUEST == "true" ]; then
  echo "this is PR, exiting"
  exit 0
fi

# enable error reporting to the console
set -e

# build site with jekyll, by default to `_site' folder
jekyll build

# cleanup
rm -rf ../eshepelyuk.github.io.master

#clone `master' branch of the repository using encrypted GH_TOKEN for authentification
git clone https://${GH_TOKEN}@github.com/eshepelyuk/eshepelyuk.github.io.git ../eshepelyuk.github.io.master

# copy generated HTML site to `master' branch
cp -R _site/* ../eshepelyuk.github.io.master

# commit and push generated content to `master' branch
# since repository was cloned in write mode with token auth - we can push there
cd ../eshepelyuk.github.io.master
git config user.email "eshepelyuk@gmail.com"
git config user.name "Evgeny Shepelyuk"
git add -A .
git commit -a -m "Travis #$TRAVIS_BUILD_NUMBER"
git push --quiet origin master > /dev/null 2>&1 (1)| 1 | Hiding all the output from git push command, to prevent token leak. |
Run everything
After doing all those steps all you need is to commit and push your jekyll branch
and then navigate to Travis CI build section
of your project to monitor your build progress.
P.S.
I hope this tutorial help you setup own Jekyll with less pain.
Supposedly described steps could be applied to other static site generators like Middleman, Awestruct etc.
Credits
The actual setup and this post was inspired by Dan Allen reply to my tweet and the code from this project